Showing posts with label nail art. Show all posts

Saturday, 25 January 2014

Hi friends! Just a quick post from me tonight - some Scottish-y themed nail art for Burns' Night and a wee review of this striping tape from Born Pretty Store. (Discount code at the bottom of the post, too!)


I was aiming for a tartan-esque design on my index finger - which could have gone better, haha - and an Argyle-inspired pattern on my ring finger. Both fabrics which are closely associated with Scotland, of course. I kept the other nails pretty simple, with a colour block, glitter gradient and some rhinestones (from a 1.5mm Born Pretty Store wheel).  The polishes I used are as follows:
- Red - Color Club 'Mamba' (from the Fiesta Collection)
- Navy - Sally Hansen Complete Salon Manicure 'Thinking of Blue'
- Blue - Kiko 385
- Silver - Color Club 'On the Rocks' (also Fiesta Collection - I looove this silver)
- Glitter - piCture pOlish 'Ruby Blou'


I used the striping tape for this 'Argyle' nail. I started with three coats of PP Ruby Blou, plus quick-dry top coat. Once dry, I marked out a diamond pattern using the tape, added one (generous) coat of Thinking of Blue and removed the tape; I did have to fill in one or two little bits with a brush, mostly because I forgot which order I'd added the tape strips in so they got a bit tangled when I was removing them...oops! The silver lines were painted free-hand over the top. 

I've been pretty impressed with Born Pretty's striping tape so far. It's a really good width and I love being able to get such crisp lines. I also think it's pretty handy that it comes in such a broad variety of colours, since you'll always be able to pick one that stands out from your base, so you can see what you're doing! I tend to place the tape with my fingers and have found you can take it off and move it quite easily if you don't get it perfect first time - I also found lifting one end with tweezers quite handy for minor adjustments, especially since the tape has a little bit of flexibility in it. I definitely think it will take a bit of practice for me to get used to the technique, though - although simple, it's a bit fiddly and I found it could be somewhat time-consuming. That's not at all a criticism of the tape itself, of course! One thing I still need to get down is the best way to remove the tape - I like to do it with tweezers for a bit more precision, but the tape seems to stick really easily to tools and fingers so I frequently ended up with wet polish on my skin when trying to remove the strips from the tweezers! Maybe some of you have some tips for me?!

If you'd like to try out some nail art supplies from Born Pretty, feel free to use my discount code:


I think this is quite a fun mix, but I don't quite love it and I'm a bit disappointed with the lines in my tartan. Practice makes perfect, though, right? 

Sorry about the hideous cuticle shrinkage on my thumb!


So, what do you think? Are you a striping tape aficionado? Do you have any tips for me?!


BREAKING NEWS: I started writing this post before dinner...I was super excited for HAGGIS! Our haggis burst in the pan and we couldn't eat it. I am devastated. :(

Tuesday, 14 January 2014

Bahahaha. Yes, that excruciating pun did just happen. I'm not even going to apologise for it.

Hello and Happy New Year! How I've missed my wee blog. November and December were really rather busy months for me and I ended up being away from home quite a bit, so sadly nail art had to take a back seat. I'd say it was a pretty productive time, though, and I'm looking forward to what 2014 will bring... I hope it will be a joyful, prosperous year for you all. :)

Nail art!


I have to start by talking about the base colour for this manicure: it's A England's Rose Bower (which I picked up in Adina's Holiday Grotto) and it is simply mesmerising. The polish itself is what sparked the idea for this nail art: the rich pinky red colour (it varies depending on the light) with that signature A England holographic sparkle looked so sumptuous and velvety and glowy that it made me think of luxurious damask/baroque fabrics... lightbulb! (Lightbulb!) I basically wore Rose Bower twice in a row, which testament to how beautiful it is! The formula is amazing, too - it's quite thick, but I'd recommend thin coats. I found it to be opaque in one thin coat, but you might want an extra for added depth and shimmer. I should also say that although this design hides the holographic twinkle a little, there is a good amount in there and it's pretty prominent, at least under good light, in person. The bottle pictures should give you some idea!


I added the baroque/damask pattern(s) using a little brush and Orly Liquid Vinyl. It's been such a long time since I've done a design that requires any kind of precision like this does and I'm so, so pleased it worked! It's even more or less symmetrical! I can't even tell you how long I spent painting test patterns on paper and thinking it was all rubbish before I even attempted a nail, haha. There was also a lot of Googling/Shutterstocking. I was in two minds about whether to do a full design on every finger and whether to repeat one pattern or vary them, but I'm delighted with the end result! 


My accent nail (which I guess is the 'Roll' in my punny title. haha) is Seventeen's Diamond in the Rough, which is a black textured polish with holographic hex glitter. I really just bought it because it was kind of weird and I wasn't sure how I felt about it at first...but now I really like it. I appreciate that it won't be for everyone, though! The formula might take a little getting used to but isn't really too difficult - err on the side of thin coats for starters, I'd say (I used two coats here). It's rougher than other textures I'd tried but seems to get a little less so after a couple of days. My only - small - complaint is that the glitter tends to get a bit buried in the base. So, what do you think of it? Would you give this kind of polish a go?!

[I think Diamond in the Rough is pretty much the same as Essie's Belugaria, from the Encrusted Treasures collection, though I don't have both to compare. For those interested, that collection is due out in the UK in February, though you can find it online already.]


Well, I've blabbed on quite enough. The essence of this post is: I (still) adore A England and I love these nails and I hope you like them too! As always, please do let me know what you think in the comments. Are you besotted with A England yet? How do you feel about unusual/textured polishes? Do you have a favourite nail from this design? I love hearing your feedback!

P.S. Thanks for sticking around despite my absence! :)

Thursday, 29 August 2013

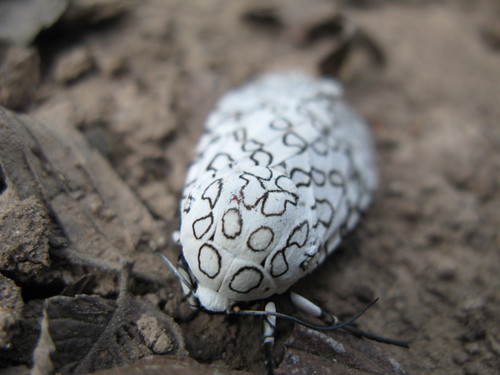
Today I am bringing you the hot new thang in animal print trends: Giant Leopard Moth print! Leopard print was, like, so 2012. Or something. Whatever.


In the (ahem) off chance that you are not familiar with the Giant Leopard Moth:


Source: http://biologie-me.blogspot.co.uk/2010/02/buggin-out-on-thursdays-giant-leopard.html


I pinned this image to my nail inspiration board on Pinterest (which I occasionally remember to use) aaages ago, so I'm glad I finally got round to making use of it!

I almost regretted beginning this design because it meant starting with a white base, which is always a pain in the backside. However, I used Sally Hansen Complete Salon Manicure in 'Ivory Skull' this time around and it was kind of okay. I mean, it's a bit sheer and streaky and if I looked veeery closely, imperfections were sometimes visible even at three coats in certain, but the formula itself wasn't difficult to use. 


After much deliberation, I added one coat of Essie 'Pure Pearlfection'. It's a silver-ish shimmer top coat, but if you look closely you can see that the individual particles have a green/pink iridescence. It's pretty subtle in person, but even more so on camera. It showed up best in underexposed images...I hope these prove that the shimmer actually exists!


I thought the random piece of paper in the background really added something...


I added the 'spots' using a super skinny cut-down brush. I had planned to use my Model's Own x WAH nail art pen, which I've tested on paper but never yet used on my nails, but when I attempted a trial run (again on paper) it seemed to have gone very watery. Not cool. If you've had a similar issue and have any suggestions, do let me know! 

I left these shiny for about a day but added ELF's matte top coat while I was taking my photos and I think I prefer them this way. It seems to help the shimmer come out to play, too. ELF's isn't the matte-est matte top coat I've seen and it doesn't stay matte especially long, but it isn't bad for the price.


Shiny/Zombie hands

Matte


So, what do you think? Did I make the right decision in adding the shimmer? Are you a shiny or a matte person? I do like this design since it's quite striking and unusual, but now I want COLOUR, so I don't think they'll last very long!

When Giant Leopard Moth print starts popping up on the catwalks, just remember that you saw it here first... ;)
Powered by Blogger.